Okay, so you went and got yourself a real microphone.
You’ve got it all plugged in, your digital audio interface is lit up, Audacity is running, lets go, right?
Not so fast.
Every bit as important as having a good microphone is knowing how and where to use it. Correct placement of your awesome new microphone can mean the difference between getting those sexy NPR tones or sounding like you’re broadcasting from a concrete tube in the bottom of a well. There’s two big factors you want to consider. Both of these things are equally important.
- Distance from the microphone to the speaker and angle of the microphone to the speaker’s mouth.
- The room you’re recording in.
Get both working for you and it’s possible to get a great recording, even on a budget. You want your recording to sound as clear and clean as possible while you’re recording it. There are things a talented engineer (ahem) can do to rescue less than perfect sound, but there is absolutely no substitute for starting with clean audio. No Pro Tools filter sounds as good as a great mic pointed in the right direction in a great sounding room. In this article, I’ll cover how to take care of microphone placement and we’ll talk about solving for room noise next time.
1. Eat That Mic
Most microphones work best for recording speech at a distance of two to three inches from the speaker’s mouth. At this distance, you’re probably going to want a pop filter or at least a windscreen to help knock down the popping noise that is created when your mouth makes B and P sounds (plosive noise). Additionally, the speaker should always be on axis with the microphone. “On axis” means that the capsule of the microphone, the part that actually captures sound, should be pointed straight at the audio source. Be aware, on axis doesn’t necessarily mean the same placement for all kinds of microphones. Most microphones come with a manual that describes the position of the capsule and polar pattern of the microphone. The polar pattern describes how sensitive the microphone is based on the angle of the audio source as it relates to the capsule. All of the microphones I recommended in my previous column have a cardioid (heart-shaped) polar pattern. Here’s the polar pattern from the Audio-Techica ATR-2100:
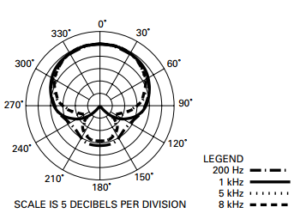
Zero degrees at the top of the circle is on axis, so in the case of the ATR-2100, this means speaking into the mic with the barrel of the mic pointed directly at your mouth. You can see, as you get further away from zero degrees, the response starts to drop away with a sharp drop to zero at 180 degrees, or the back of the capsule (the side with the jacks for the cables and so on). So, if you’re holding the microphone with it pointing at the ceiling as you talk into it (90 degrees), you’re experiencing a significant drop in volume across all frequencies just by pointing it in the wrong direction.
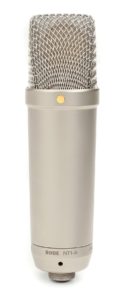 For comparison’s sake, the Røde NT1-A also has a cardioid polar pattern, but the capsule is mounted at 90 degrees to the barrel of the microphone. This means that on-axis for the Røde means speaking into the side with the gold dot on the barrel. You can even see a little of the capsule through the grille. This also means that the back side of the mic from the gold dot is 180 degrees off axis, and therefore the spot where the cardioid polar pattern drops the volume out. Knowing where that cardioid drop off is can be super useful for reasons I’ll discuss in the next installment.
Get comfortable
Lots of people choose to hold their microphone while recording a podcast. There’s nothing wrong with this per se, but I recommend getting a good mount and letting it do the work. There’s a couple of great reasons to mount your mic.
First, stability and fatigue. If you’ve got your mic in the proper position, on-axis and 2-3 inches from your face, you’re holding your arm up in front of you. If you’re recording an hour long podcast, are you hitting correct mic placement every time you speak into the mic? Are you changing position slightly or possibly beginning to speak before you’ve moved the mic into position or still speaking as you drop your arm away? All of those things can affect your sound. Also, the process of moving the mic to the correct position could cause the cable to drag, which can transmit noise to the microphone, causing clunking and rustling noises. Having a microphone mounted in the correct position means your mic is ready to go at all times and noise-free.
Second, pop filtering. I’ve said before that you can reduce pops with a windscreen and that’s true, but to really minimize plosive noise, nothing beats a good pop filter. Pop filters mount on a microphone stand, so if you want to knock that noise out correctly, you need a stand.
Third, comfort. A microphone properly mounted on a stand in correct speaking position means you don’t have to worry about it. You can get yourself into a position that’s comfortable and focus on the thing you want to be doing, which is making a great podcast.
Get in touch
As always, Yōkai Audio is here for you. If you need help getting your gear set up, troubleshooting an audio issue, or even a front-to-back podcast recording solution, give us a jingle. We can help.