Recording a podcast that sounds amazing can be a challenge, but these six core concepts will keep you pointed in the right direction. Got questions? I’m here to help.
1. Mic Placement
Correct positioning of almost any general purpose microphone is going to be 2-3 inches from the speaker’s mouth with the barrel of the microphone pointed at the speaker’s mouth. There are exceptions to this rule, so make sure you check the manual that came with the microphone to get accurate placement info. It’s possible to get good sound while holding a microphone in your hand, but I find it easier to use a microphone stand with a boom to place the microphone in position that allows me to speak comfortably and naturally without having to worry about correct placement. If you decide to go handheld, make sure your microphone cable is positioned in a way that minimizes potential bumps and snags when moving the microphone. Bumping the cable will transmit sound into the microphone, making a low-frequency “clunk” noise in the recording. Likewise, if you use a tabletop mic stand, avoid bumping the table or picking up and setting down objects like drinking glasses on the same table while recording. The table will transmit sound through the stand and into the microphone. Use a wind screen to control plosive noise (B and P sounds that make a popping noise from sharp exhalation). They’re super cheap and fit over the end of the microphone like a sock. For a more in-depth discussion of microphone placement, check out my post on the topic.
2. Flatter Your Sound By Recording in the Right Environment
The shape and contents of the room you record in can have an immense effect on the sound of your recording. Generally speaking, high ceilings, long, uninterrupted walls, and big windows can bounce sound back at you and give your recording an echoing quality. Fabrics and soft things can deaden this effect. Try clapping your hands at a steady pace as you walk through your home, listening to how the sound changes from room to room. You’re looking for the room with the least obvious reflections or echoes. That’s where you want to record. If you have limited options for recording space, get creative. Try hanging comforters or sheets in front of windows or walls. Construct a blanket fort. Record facing the gap between the mattresses in a bunk bed, or facing a closet full of clothes.
3. Record Each Speaker Independently
To the extent software and hardware allow, each speaker should have their own microphone and independent channel in the recording software. Separating each speaker onto their own track allows you to adjust each speaker’s settings independently of the other speakers, meaning if you’ve got three speakers and speaker #2 wasn’t quite hitting their mic position correctly and their volume is a little low, you can bump up speaker #2’s volume without making speaker #1 and #3 louder.
A. Remote Recording
If you’re recording two speakers remotely using Cleanfeed, be sure to select the “Stereo Split” option on the settings screen that comes up when you begin your recording. If you have more than two speakers, Cleanfeed offers multitrack recording with a paid Pro account. Using their free account with more than two speakers will combine two or more speakers onto the same track, which can make editing much more complicated and time consuming.
B. In-Person Recording
If you record multiple speakers in the same room, you will need a digital audio interface with an appropriate number of inputs. Focusrite makes excellent interfaces that are compatible with most major audio editing platforms. For recording audio with a microphone, you need XLR inputs. Generally, the entry-level models come with two XLR inputs, gaining additional inputs as the interfaces get more expensive. If your podcast has two hosts and conducts in-person interviews on a regular basis, you’re going to want at least three XLR inputs for the best possible sound quality. If you need help figuring out what kind of hardware you need, take a look at my list of recommended gear.
4. Free up computer resources and bandwidth
Recording audio requires your computer to move large amounts of data quickly. You can make this job easier for your computer by shutting down any unnecessary processes or programs you might have running. Certain programs like iTunes and web browsers can suck up tons of memory your computer could be using to record clean audio, even if they’re just running in the background. If you’re at all concerned about your computer’s ability to keep up, close every program except for the software you’re using to record. If you’re using a browser-based recording solution like Cleanfeed, close all other browser tabs. Also, if you’re recording remotely, internet connection speed is incredibly important. A slow internet connection can create all kinds of noise in your recording, from relatively minor pops and crackle to full blown stutter and artifacting. If at all possible, connect your computer to the internet with an ethernet cable instead of WiFi. Ethernet is always faster than WiFi. Turn off other devices that might be competing with your computer for bandwidth like game consoles, cell phones, iPads, and so on. The idea is to get your computer and your internet connection as free as possible to focus on making a clean recording.
5. Set Your Levels
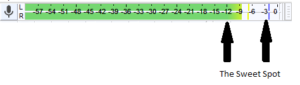
Once your microphone is placed correctly and your recording equipment and software are plugged in and turned on, check your input meters to ensure you will be recording at an appropriate volume. Check the input meter for each microphone on the recording software. When speaking at a normal conversational volume, your input meter should be bouncing around near the top of the meter without going to the very top. In Audacity, that means between about -12 and -3 on the input meter, like so:
In Cleanfeed, the meter is vertical instead of horizontal, but the idea is the same. You want to be about here:

Going all of the way to the top in Cleanfeed or to zero in Audacity is called clipping. Clipping means the input is too high and will distort on the recording, which sounds like crackling or popping. Clipping is okay if you’re laughing or coughing or making some other unexpectedly loud sound, but clipping when you’re speaking at a normal conversational level means you need to reduce the input. If you’re in correct position relative to the mic but your volume is too high or too low, adjust the gain on the hardware or software you’re using to correct your level before recording. Make sure you check each speaker’s gain so everyone is speaking at approximately the same volume.
6. Sound Check
Every single time you record, conduct a short test recording and play it back to yourself first. Your test recording should incorporate all speakers you intend to record during this session. Listen carefully to the test recording. Are all of the speaker’s volumes appropriate? No one is too loud or too quiet? How about the room noise, is there a noticeable hum from a refrigerator, air conditioner, or furnace? Is your computer lagging, causing weird stuttering or artifacting? Echos from a high ceiling or nearby window? Making a test recording will allow you to discover and correct all sorts of issues that could potentially wreck an otherwise fantastic episode of your podcast.
Never forget the Iron Law of Recording: it’s far easier to fix sound before you record than it is to fix it after.
GET IN TOUCH
As always, Yōkai Audio is here for you. If you need help getting your gear set up, troubleshooting an audio issue, or even a front-to-back podcast recording solution, give us a jingle. We can help.